Wondering about the process behind my wall hanging sculpture? The curiosity from people I've met, both online and in person, has been incredible, and inspired me to do a process blog post outside of my usual Patreon.
My Patreon is where I share the heart and soul of my creative process. By becoming a patron, you're not just supporting me; you're becoming part of a community passionate about art. Each tier offers unique rewards, but every supporter gets an inside look into how I bring my creations to life. Even if you're just peeking in, your presence matters more than you know.
Now, let's dive into the creative process. In this blog post, I'm sharing a snippet of the magic behind crafting my wall hanging sculpture, "Grace".
(Available for purchase here)
Please note that I am NOT paid to endorse any products mentioned in this post. However, as an Amazon Associate, I may earn from qualifying purchases made through the provided links.
STEP 1 - THE BASE
SUPPLIES:
 |
This stuff is wonderful, and I use it in all my sculpting. It bends easily, hold it's form well, doesn't rust, and is one the staples in my studio. |
 |
Easy to cut, dip into water, squeeze, and layer on almost any surface. Dries completely in about 24 hours. |
 |
I like to wear nitrile gloves for the entire process to protect my hands, especially when we get to the sculpting. |
.
First, shape the wire mesh into an oval face-like structure, using foil or a mannequin head covered in Saran wrap as a base. Layer the wire mesh (about 2 layers) over the structure, followed by three layers of plaster cloth. Let it dry completely to form a sturdy base for the face.

STEP 2 - THE FACE
SUPPLIES:
 |
It's expensive, but once you mix two equal parts for 1 minute, you get a beautifully pliant working time of about 30-40 minutes. Then, firm working time for about one hour where you can smooth and add textures. Then, after 24 hours, it is hard as stone, no shrinkage, paintable, and delightfully resilient. |
.
My favorite part: sculpting the face. Because of the working time of this super strong and wonderful clay, I work in sections. There is no planning at this point, I just know the face in my mind wants to get out through my hands.
I keep mushing the clay around until her face looks right. I mix another pile of clay, and keep working. Because of this I work in sections: eyes, nose, cheeks, then lips, then back around again.
WEAR GLOVES AT ALL TIMES. This clay will stick and dry to ANY SURFACE with a bond harder than glue.


STEP 3 - THE CROWN :
I used found metal bands, wooden cooking skewers, and a hot glue gun I need to replace because it is trash and I will not recommend it. These materials are part of my manic junk sorting and collecting I do on the weekly. It's basically a bunch of bins with "ooooh this looks useful one day!" and I keep them for years, or use them too much and break them get get a cheap replacement. So I don't really have any way of recommending where and how to purchase those things.
This is how I constructed the crown with wooden cooking skewers, metal bands, and hot glue.


STEP 4 : SCAFFOLDING
Materials: Uhhh, let's refer to my manic "I FOUND THIS - LOOKS USEFUL" bins. You can use anything solid wood that looks like that you can ruin by drilling holes into it.
I created a scaffolding inside the face with dowels. They are attached to the back metal mesh with glue and Apoxie clay.

Then, I ran the dowels through the wood to create a solid off-wall-scaffolding. I glued everything (so far) together with super glue (WEARING GLOVES) then layered Apoxie clay on for ultimate structure.

I wanted the angle of her face to bend slightly down, but the halo to go parallel to the wall, so this took some adjusting. Turns out the coffee cup was perfect. It looks like a simple solve, but it took a while to come to it.

STEP 5 : PLANNING THE WINGS
Cutting out feathers and adjusting them helped me visually plan how I was going to sculpt the feathers next. This process was tedious, but got me a great feel for how I wanted the feathers shaped, angled, and at what size.

STEP 6 : MAKING THE FLOWERS
I made lots and lots of flowers out of air dry porcelain and Apoxie clay. I got so focused and was covered so thoroughly in clays, I didn't take many pictures. But the key is to have the main flowers done and dry. Then filler flowers can always be added after. I did take pictures of the flowers successes, so you can see how I built them only skewers. (Yes those are huge chonks of cinnamon in my coffee)


STEP 7 : WING SCULPTING
SUPPLIES:
 |
This comes in all kinds of thicknesses, and I usually have about 3 different ones - but this 3mm one is super helpful for big areas like wings.
|
 |
(I know...it's called DUCK Tape, not Duct Tape) Great for giving strength to paper. I like that bit's made of cotton. |
 |
It's a 2 part combo, VERY stinky for about 5 minutes, and very strong forever. I get about a 2 minute good working time with it. |
 |
This unique air hardening modeling clay requires no firing or baking. It's cracks a bit when drying between thin and thick layers, but those can be filled in, and it dries super light-weight. I LOVE this clay. |
 |
Very smooth working, holds texture beautifully, dries strong for such a lightweight clay with minimal shrinkage and no visible cracking. |
 |
The most beautiful air-dry clay I have ever sculpted with. Smooth, perfect for flower petals, dries fast and luminous. The most therapeutic clay for my process. |
I drew the wings onto paper, cut them out, then attached armature wire with duck tape. Next the paper got sealed with layers of duck tape. The wings got bent and shaped just right. I attached them to the wood base behind the face with epoxy glue and more Apoxie clay.


I didn't want to risk the wings getting too heavy, but I needed them to hold their shape. Even though Apoxie clay is heavy, it is super strong and thus a great solve for the "bones" of a sculpture. This is where I created a base to hold the wing.

This is also a good time to test the size of the flowers. If the flower covers a spot on the wing, it won't need as much detail there.

Now the sculpting of the wings beings in earnest. Each feather was sculpted right into the clay.
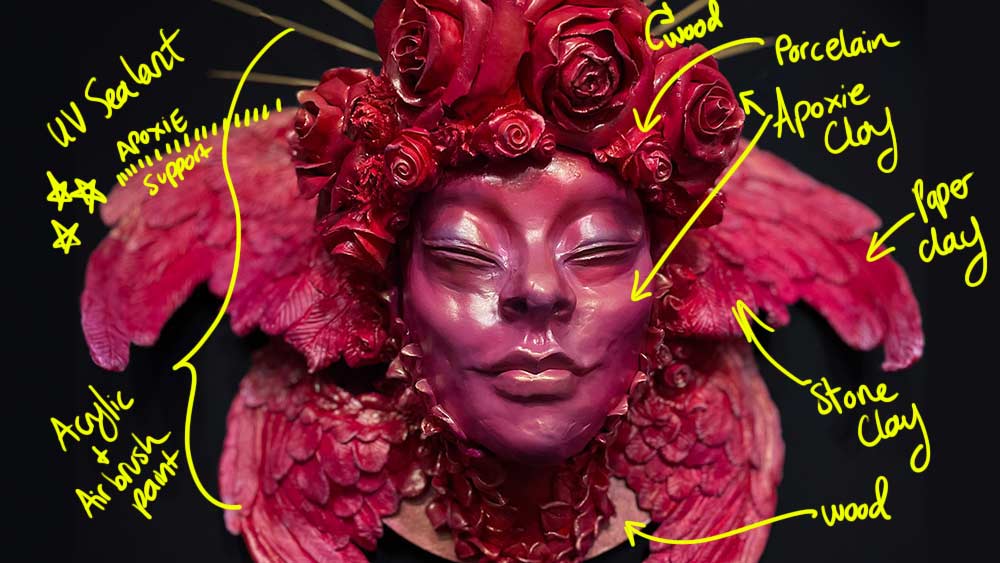
The base of the wings was sculpted with the stone clay.
The end of the wings (which are lifted off the wooden base) were made with paper clay.
The white flowers were made of air dry porcelain, and added as I worked between wings.


STEP 8 : PAINTING
SUPPLIES:
 |
Absolutely crucial to cover everything with this before paint. Let it dry. It bonds to everything: glass, clay, wood, wire, paper, etc. It create a smooth, even, white canvas for the paint o lay one veenly and smoothly. |
 |
Not going to lie, this is a very "beginner" airbrush paint set, but I LOVE their red and purple so much for this piece, and it had decent coverage. Their red is not really a "true" red, more of a ruby, and their light purple was the perfect "rasberry". I did only a bit of mixing and altering because the tones were just right. |
 |
I have had this airbrush for over 8 years. They have made new ones since then. This is the model I have and it still works wonderfully. |
 |
Seals all the paint and creates a protective coat. Very stinky for about 2 days, so you have to let the piece air out. |
The first layer must always be white Gesso, especially when using so many different clays. Their surfaces are varied and porous, so each one will accept paint at a different rate. This means one color of paint will look different on each clay, and you will waste a lot of paint as well.
I like to layer a base coat of bright color to get my final layer a bit of a glow. This is also when I put in my hard shadows and bright highlights so those can glow through as well.


Then it's about layering thin washes, over and over, until it is just right. I also go in with acrylic brushes and paints to hit the edges and the details.

And that is how I created this piece.
Thank you so much for reading this far. I hope you enjoyed it.